How to Repair Cracks in Concrete

A crack in the concrete of your driveway, patio, or walkway can be an eyesore, lower your home’s value, or even cause minor accidents. Even the most well-maintained concrete will eventually start cracking or gaping, so you need to know how to fix these problems when they arise.
Repairing these imperfections sooner rather than later can stop them from spreading and save you both money and time in the long run. Luckily, you don’t need to be a DIY pro to fix the cracks in your concrete. All it takes is a half-day of work and some elbow grease. Use this repair guide to help restore your concrete to its former glory and keep it looking good for years to come.
When to Repair vs Replace Broken Concrete
Before you start filling your cracked concrete, it's important to know whether you should repair or completely replace the surface. While small cracks can often be fixed with simple repairs, severe cracks may require a complete replacement:
When to Repair
- Minor Surface Cracks: Hairline cracks or small surface imperfections can usually be repaired using concrete filler or epoxy.
- Localized Damage: If only a small section of the concrete is damaged, patching or resurfacing is a practical solution.
- No Structural Concerns: If the cracks don’t affect the structure of the surface, a repair will be sufficient.
When to Replace
- Wide or Deep Cracks: Cracks larger than 1/2 inch or those that extend through the entire depth of the slab often indicate serious issues.
- Uneven Slabs: If sections of the concrete have shifted or become uneven due to settling, replacement may be necessary.
- Severe Damage: Extensive cracking, crumbling, or sinking usually means that the slab has reached the end of its lifespan and should be replaced entirely.
If you’re still unsure of whether you should repair or completely replace your concrete surface, consult a professional to assess the damage and recommend whether repair or replacement is the best course of action.
2. Choosing the Right Concrete Repair Mix

You can’t just patch things up with more concrete; instead, you’ll need a specific repair mix. Pay close attention to what concrete repair mix you buy. For large cracks or chipped edges, mortar mixes are a good option. If your cracks are 1/8-inch or narrower, you’ll be better off with latex or epoxy mixes.
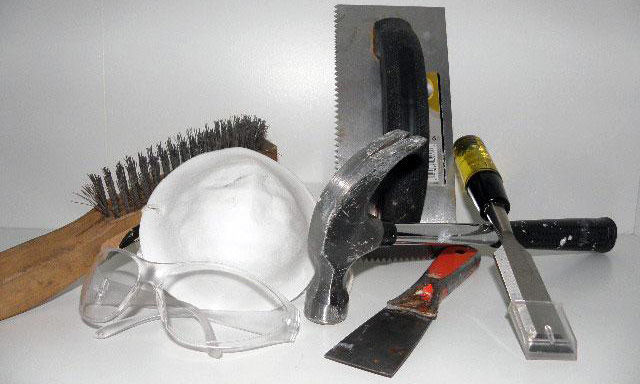
3. Chisel Debris by Keying

Before you can seal the crack, you’ll need to broaden the gap under the surface. This process is known as "keying" and helps the concrete repair mix bond better. You’ll do this with your chisel. Insert the chisel at an angle into the crack, then use the hammer to pound down gently.
4. Clean out the Crack

You’ve probably made quite the mess by keying the crack, so now you have to clean it up. This is where the wire brush, broom, and vacuum come into play. Remove debris from inside the crack using the wire brush, or sweep it out of the crack using the broom. Then, use the vacuum to suck it all up so it’s out of your way.
5. Mix the Concrete Repair Compound

Now that you’ve prepared the crack, it’s time to get the repair mix ready. For this process, just follow the instructions on the package, as they all vary slightly. If you’re lucky, you may have purchased ready-to-go concrete filler, so you’ll just skip this step.
6. Fill the Crack

With your compound ready to go, grab your trowel or putty knife and begin applying it into the crack. Make sure you fill the bottom of the crack first, pushing down. This process also helps to remove air bubbles. Keep on applying the mix until the entire crack is filled to the level of the concrete.
If you’re using a pre-mixed compound that comes in a bottle with an application nozzle, you probably won’t need the trowel. Just insert the application tip into the crack and squeeze out the mixture.
Once the crack is filled, smooth it out with the trowel. If the rest of your concrete is textured and you want the patch to match, try running a dry paintbrush along the surface to mimic the feel.
7. Let It Sit

Your work is done for now! Give the concrete time to cure. Every compound is a little different, but usually, allowing it to cure overnight is a good idea. That way, you can see if you need any touchups before you seal it.
8. Apply the Sealer

If everything looks good after curing, it’s time to seal up your patch. This will prevent it from staining. We recommend using a water-based polyurethane sealer, as it’s easy to work with and dries quickly. Sealant is relatively easy to use; just brush it on and work the mixture into the surface. You may want to use a roller if you have smooth concrete. Let it dry for a few hours, then apply a second or third coat for good measure.
Enjoy Your Restored Concrete

As you can see, repairing cracks in concrete is not a complicated process. It just takes a few hours of your time and will make your home’s exterior shine. It’s one of the simplest things you can do to boost curb appeal and help your driveway or backyard stand out in all the right ways.
Preventing Concrete Cracks
Concrete is a durable material, but it’s not immune to cracking. While it’s impossible to eliminate the risk of cracks entirely, proper maintenance and a few preventative measures can significantly extend the life of your concrete surfaces. Here’s how you can minimize future damage:
- Seal the Concrete Regularly: Applying a concrete sealer every 1–3 years protects the surface from water penetration, chemical exposure, and freeze-thaw cycles.
- Ensure Proper Drainage: Poor drainage leads to water pooling on the concrete, which increases the likelihood of cracking over time. Make sure your concrete surface slopes away from your home to direct water away.
- Use Expansion Joints: Expansion joints are designed to absorb movement caused by temperature changes. Without them, concrete slabs can expand and contract, leading to cracking.
- Apply a Weatherproof Coating: A weatherproof coating can provide an extra layer of protection for extreme weather. These coatings reflect UV rays and prevent water infiltration, reducing wear and tear.
Repairing cracks in concrete is a simple process, but it’s important to address them proactively to prevent further damage. Following these guidelines ensures a long-lasting and durable finish. With the right tools and steps, your concrete can stay strong, safe, and appealing for years to come.
While do-it-yourself projects can be fun and fulfilling, there is always a potential for personal injury or property damage. We strongly suggest that any project beyond your abilities be left to licensed professionals such as electricians, plumbers, and carpenters. Any action you take upon the information on this website is strictly at your own risk, and we assume no responsibility or liability for the contents of this article.
Related Articles

Build a Deck That Stands the Test of Time
Build a deck designed to last. From strong foundations and durable materials to moisture protection and hardware choices like post bases, this guide shows professionals how to create structures that stand the test of time.
Learn more
The Best Mailboxes of 2025: Modern, Decorative, Secure, and Residential Options
Discover mailbox ideas, tips, and buying guides to help you choose stylish, secure, and durable options that enhance your home’s curb appeal.
Learn more
Roofing Nails: A Comprehensive Guide to Nails for Roof and Shingle Installation
Explore expert guides on roofing nails – learn how to choose, install, and maintain the right nails for lasting, secure roof and shingle performance.
Learn more
Repairing and Sealing Concrete and Asphalt Driveways
Tips to help keep your driveway looking new for years to come
Learn more
How to Build a Fire Pit
A simple and affordable outdoor DIY project with a step-by-step guide
Learn more